Bulk Dispatch Excel Template
Description
How to fill in the Excel template for use with the Bulk Dispatch action or TransForm API BulkDispatchProcessExcelFile method.
Discussion
The Bulk Dispatch action dispatches forms specified in an Excel file, which Alpha TransForm generates for you as part of the action. Depending on the complexity of your form design, the file may contain multiple sheets that you must fill out.
Excel File Structure for Simple Forms
If the forms you are dispatching do not contain Data Groups, the structure of the Excel template is very simple. The Excel template will have a sheet for each form type you are dispatching.
For example, say you specified that you want to dispatch instances of the Inspection form and the FollowUp form, your Excel template will have a sheet called Inspection and another sheet called FollowUp.
The Excel template will also have a sheet called __bulkDispatch_settings. Filling out this sheet is optional. It contains settings that control how notifications are sent when the forms are dispatched. See Configuring Dispatch Notifications for more information.
Each sheet in the Excel template will have columns for each field in the corresponding form. For example, assume the FollowUp form has these fields:
- Address
- City
- State
- Zip
- Date
- Comments
The FollowUp sheet in the Excel template will have these columns:
__id | Address | City | State | Zip | Date | Comments | &#person | &#status | &#comments | &#duedate |
|---|---|---|---|---|---|---|---|---|---|---|
|
|
|
|
|
|
|
|
|
|
|
Note that some of the columns are prefixed with &#. These columns are metadata columns. They are for data fields that are not part of the form itself, but describe some aspect of the form.
The following metadata fields are defined in the Excel template:
- Metadata Field
- Description
- &#person
The person or queue to which the form is dispatched. If dispatching to a person, &#person is the email address for the user's TransForm Account, e.g. "[email protected]". If you enter an email address that is not associated with a TransForm account, the Dispatch action will fail.
If dispatching to a queue, enter the queue name with the prefix "queue:". For example, queue:default or queue:unclaimedtasks. The queue must exist in the TransForm Account. See On-device Asset Policies: Queues to learn more about queues.
- &#status
Required All form instances have a status, such as "open", "closed", or "submitted". The status a form can have is defined on the Permissions tab in TransForm Central. By default, TransForm provides the following statuses:
- open
- submitted
- approval
- closed
When specifying the &#status, you must enter the Status Id for the status.
If you have modified the statuses for your TransForm Account, the available options may differ. Check the Permissions tab for your TransForm account for a list of available statuses.
- &#comments
Every form can have a comment. Note that the metadata &#comments field is not the same as the Comments field shown in column 7 of the table above. The Comments field shown in column 7 is part of the form data. Not all forms will have a Comments field, but all forms will have a &#comments metadata field.
- &#duedate
The form's due date. This is the date the user is expected to submit the completed form. The syntax for this value is yyyy-mm-dd. For example:
2020-06-22
The &#status metadata field is the only required field.
The __id field is a number to uniquely identify each row in the sheet. The __id field is not part of the form's data and is only required if the dispatched forms also include Data Groups.
Here is an example of filling in the Excel template for the FollowUp form:
__id | Address | City | State | Zip | Date | Comments | &#person | &#status | &#comments | &#duedate |
|---|---|---|---|---|---|---|---|---|---|---|
1 | 23 Main St. | Boston | MA | 02139 | 2020-06-15 |
| open |
|
| |
2 | 11 Circle Dr. | Burlington | MA | 01803 | 2020-06-15 |
| open |
|
| |
3 | 4 Pleasant St. | Lexington | MA | 02421 | 2020-06-22 |
| open |
|
|
When the completed Excel template is uploaded to TransForm Central, three form instances of the FollowUp form will be dispatched (to [email protected], [email protected], and [email protected]). Each row in the FollowUp sheet of the Excel template represents a form instance that will be dispatched.
Excel File Structure for Complex Forms (Data Groups)
If the forms you are dispatching contain Data Groups, the Excel template will be more complex. The Excel template will have a sheet for each form type you are dispatching, as well as the __bulkDispatch_settings sheet. In addition, there will be a sheet for each Data Group in the form(s).
For example, say you specified that you want to dispatch instances of the Inspection form. This form may have a Data Group called Equipment that allows the user to enter data for multiple pieces of equipment.
The Excel template for the Inspection form will have the following sheets:
- Sheet Name
- Description
- Inspection
A sheet containing the top level fields in the Inspection form.
- Inspection_Equipment
A sheet for the fields in the Equipment Data Group. Data Group sheets are always prefixed with "FormName_". E.g. The Equipment Data Group is prefixed with "Inspection_".
- __bulkDispatch_settings
A sheet for optionally customizing how the forms are dispatched. See Configuring Dispatch Notifications for more information.
Let's assume that the Inspection form has these fields:
- Address
- City
- State
- Zip
- Date
- Equipment.Name
- Equipment.Comments
The top level fields in this form are Address, City, State, Zip, and Date, and the Equipment Data Group has a Name and Comments field.
The Inspection sheet in the Excel template will have this structure:
__id | Address | City | State | Zip | Date | &#person | &#status | &#comments | &#duedate |
|---|---|---|---|---|---|---|---|---|---|
|
|
|
|
|
|
|
|
|
|
The Inspection_Equipment sheet in the Excel template will have this structure:
__id | Name | Comments | __linkId | __linkTable |
|---|---|---|---|---|
|
|
|
|
|
All sheets for Data Groups have the following fields:
- Field
- Description
- __id
The id of the row to uniquely identify the row.
- __linkId
The __id of the row in the specified __linkTable to which this record is linked.
- __linkTable
The name of the sheet to which the record is linked. When the template is filled in every row will have the same value in this column.
Notice that the sheet for the Data Group does not have any metadata fields (i.e. fields starting with &#). Only the sheet for the top level fields in the form contains metadata fields.
Here is an example of how the Excel template for the Inspection form could be filled in:
The Inspection Sheet
__id
Address
City
State
Zip
Date
&#person
&#status
&#comments
&#duedate
1
23 Main St.
Boston
MA
02139
2019-06-03
open
2
11 Circle Dr.
Burlington
MA
01803
2019-06-03
open
3
4 Pleasant St.
Lexington
MA
02421
2019-06-03
open
The Inspection_Equipment Sheet
__id
Name
Comments
__linkId
__linkTable
1
Boiler
1
Inspection
2
Stove
1
Inspection
3
Refrigerator
1
Inspection
4
Boiler
2
Inspection
5
Thermostats
2
Inspection
6
Stove
3
Inspection
When the completed Inspection Excel template is uploaded, three instances of the Inspection form will be dispatched -- one for each row in the Inspection sheet. The form dispatched to [email protected] will contain three entries in the Equipment Data Group corresponding to rows 1, 2 and 3 in the Inspection_Equipment sheet. Notice that the __linkId field in these three rows of data all point to the row with an __id of 1 in the Inspection sheet (the record for "23 Main St.")
The form that is dispatched to [email protected] will have two rows of data in the Equipment Data Group, and the form that is dispatched to [email protected] will have a single Equipment Data Group record.
Dispatching Forms that Contain Images
If dispatched forms contain Image fields, you can specify the images to show in the fields as follows:
Upload the images to a server that TransForm can access, such as Amazon S3, DropBox, Google Drive, or your own server.
Enter the URL of the image on the server in the image field of Excel template.
For example, say you have an file called c:\equipmentImages\boiler234.jpg. You could upload this image an Amazon S3 bucket and its URL might then be: https://acmecoimages.s3.amazonaws.com/boiler234.jpg. You would enter the Amazon S3 URL in the image field of the Excel template.
Configuring Dispatch Notifications
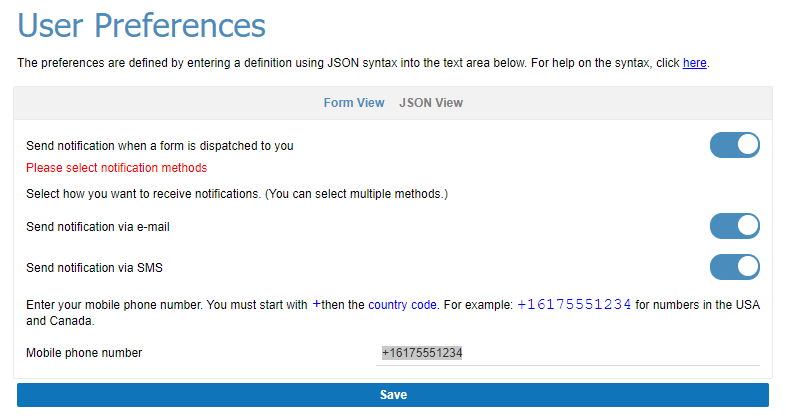
When forms are dispatched to a user, a notification can be sent to the user. The type of notification sent to each user is determined by the user's User Preference settings. Users can specify their notification preferences in TransForm Central or within the TransForm App. The user can specify that they want to receive notifications via email, SMS messages or both email and SMS. If a user selects SMS as an option, they must specify a mobile device phone number.
The image below shows how a user can set their preferences in TransForm Central:
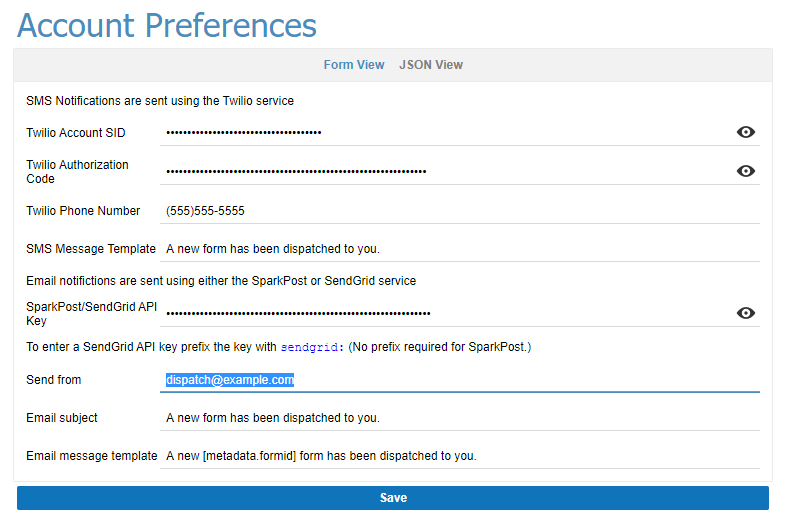
In order for notifications to be sent, the TransForm account owner must configure the Account Preferences for sending email and/or SMS messages. Email notification are sent using either the SparkPost or SendGrid service. These services have a free tier, but you must register for an account to generate an API key.
SMS messages are sent using Twilio. You need to register for a Twilio account to generate credentials for sending SMS messages.
TransForm Account Preferences are set in TransForm Central by selecting the Change Preferences menu option in the Account Settings section. The image below shows the screen for defining Account Preferences:
The Excel template includes a sheet called __bulkDispatch_settings that includes optional settings for configuring notifications. When you open the __bulkDispatch_settings sheet, it will contain the following information:
__propertyName | __value |
|---|---|
__comment | these properties control how the Excel file is processed |
sendSummaryNotification | comment:Specify 'yes' or 'no' to indicate if individual notifications should be sent out for each form that was dispatched, or a single notification to each person telling how many forms were dispatched to them. Default value is 'no'. |
summaryNotificationTemplate_email | comment:Specify the template to use for the summary email notification. Your template can use [count] as a placeholder for the number of forms that were dispatched. Only meaningful if 'sendSummaryNotification' is set to 'yes'. |
summaryNotificationTemplate_sms | comment:Specify the template to use for the summary SMS notification. Your template can use [count] as a placeholder for the number of forms that were dispatched. Only meaningful if 'sendSummaryNotification' is set to 'yes'. |
Notifications can be sent for each form that is dispatched, or a summary notification can be sent. For example, say that you fill in the Excel template to dispatch multiple forms to [email protected]. If you set the sendSummaryNotification property to yes, then only one notification will be sent to [email protected]. On the other hand, if the sendSummaryNotification property is set to no or is not set, then a notification will be sent for each form dispatched to [email protected].
The notification message is defined in Account Preferences. If summary notifications are enabled, you can specify a custom summary message in the summaryNotificationTemplate_email and summaryNotificationTemplate_sms properties for email and SMS messages, respectively.
See Also